How to perform a gauge R&R MSA study
A gauge R&R study measurement system analysis (MSA) is used to establish if a measurement system is able to reliably distinguish between the expected range of parts produced. By conducting a Gauge R&R study, we can determine if our measurement system is suitable for our particular application. Are we rejecting good items unnecessarily? Or, is our measurement system too elaborate (expensive) for our application? To know for sure, we'll need to perform a Gauge R&R study MSA.
A gauge R&R study checks the suitability of your measurement system
When measuring parts, our measuring systems can often produce multiple lines of normally distributed measurement data. The data looks great, and everyone is happy, right?
But how do we know if the variation (changing measurements) actually came from different size parts? Could the variation be coming from somewhere else? Like a failing gauge? Loose fixtures? Operator interaction? If the measurement data variation is not coming from the parts, then we need to question whether it's worth measuring at all.

Sources of variation
When looking at measurement data the variation always comes from two potential sources:
1. The parts
Different size parts caused by the natural variation of the manufacturing process etc. This is known as the part-to-part variation.
2. The measurement system
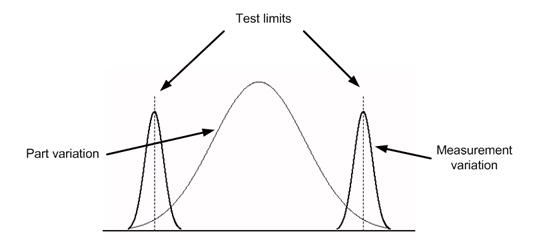
The measurement process will have its own natural effect on measurement variation, this breaks down into a further two sources: The gauge itself (repeatability) and the effect of the operator and process (reproducibility). For example, one operator could set up differently to another, or merely press harder.
Sometimes there can be more gauge R&R variation than part-to-part variation
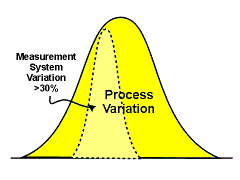
Problems arise when the gauge R&R (gauge variation) is so big that we are unable to reliably detect a difference in the actual parts. Until we run an MSA study, we do not know for sure where the variation is coming from and how much gauge error there is.

Select different sized parts for your gauge R&R study
Running a gauge R&R MSA is straightforward, but there are a couple of fundamental rules that need to be observed, or you may generate unsatisfactory results. Selecting the right parts is critical.
If all the test parts used during the study are of similar size, then the study variation will have to come from the measurement system. If the parts are different, then more variation will come from the parts themselves. Selecting parts that represent the full range of sizes that the process can produce (big ones and small ones) is essential. The MSA study will tell you if you are able to distinguish between the different sizes of parts produced and how well you can do this.
Note: A measurement system may be unsuitable for measuring parts off one process, but suitable for another. It,s all about the relationship between parts, process and the measurement gauge itself.
Gauge R&R study MSA walkthrough
1) First, download the Gauge R&R MSA Pro tool from Adaptive BMS.
2) Open the Gauge R&R MSA Pro tool — it,s an MS office excel file.
3) Identify 2-3 operators to help you (you could be one of them)).
4) Select your parts; you will need between 2-10. Label them clearly.
5) Now get each operator to measure the parts using your target gauge, and standard set-up and measuring process. Each operator will have to repeat the process two or three times. This is what the trial cells are for.
Note: It's better to randomize the operators, parts, and trials. Rather than getting Rod to measure parts 1-10, shake it up a bit. Get Jane to measure part 2, then ask Rod to measure parts 5 and 8, etc.
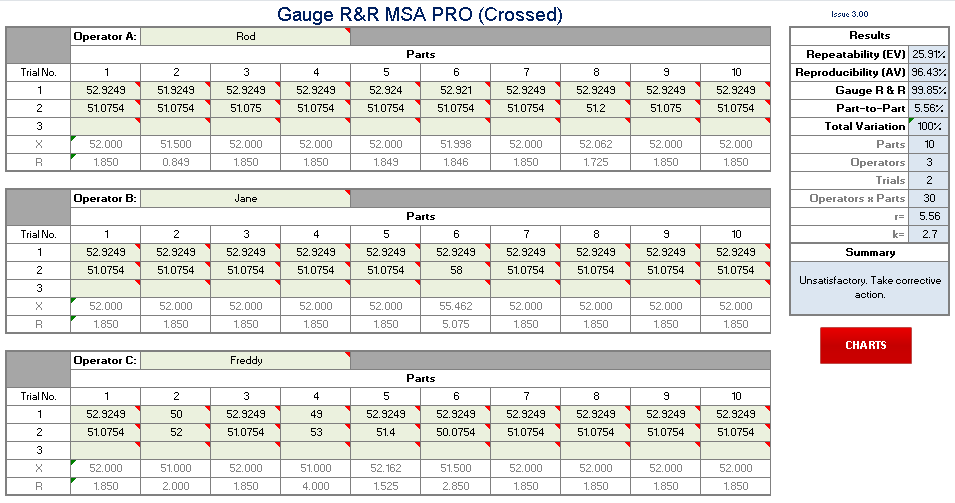
6) Type each measurement result into the Gauge R&R MSA Pro worksheet.
7) Repeat until all the required cells are filled. Leave unused cells blank.

If gauge R&R is below 10% then the measurement system is good
When completed, the Gauge R&R MSA Pro worksheet will tell you the total variation due to the gauge and if the gauge is suitable.
Guidelines for gauge acceptability are shown below:
| Gauge R&R | Acceptability |
|---|---|
| Below 10% | The gauge is satisfactory. |
| 10%–30% | The gauge may be satisfactory, depending on the magnitude of the use, cost of new gauges, cost of repairs, etc. |
| 30%–100% | The gauge is unsatisfactory. Take corrective action. |
Performing an MSA is necessary and straightforward
If we measure parts regularly, then it is essential to check that the measurement system is correct. Performing an MSA will prevent wasted costs and effort in the future.